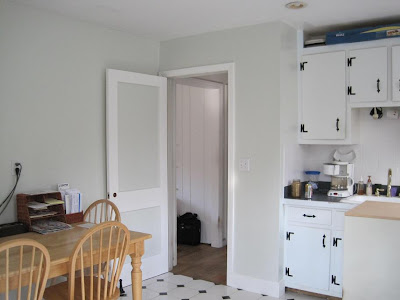
After spending four weekends (and some time during work nights) on this, Phase 1 of my Kitchen Project is complete. The project began on Friday March 19, 2010. A little history...
For several reasons, my original kitchen makeover project never got finished when I first moved into my “fixer upper” house. The major work was completed, including tiling the floor and counter, primering and painting the dark brown wood cabinets, but minor work never got completed. My kitchen makeover was incomplete and an eyesore that I finally got used to ignoring as the years went by.
That was the first time I ever tiled. It was back breaking work to use a hair dryer and scraper to get the original linoleum floor ripped up. Then it had to be tiled in sections, to allow it to cure/dry before the appliances could be moved onto it (they got moved around the room during the process). I still remember my cat walking into the freshly tiled room and me yelling at him to get off the floor (as if he would listen) because no weight was supposed to be on it until it cured/dried. But then I calmed down and realized he wasn’t heavy enough to cause a problem.
I wanted to do a “Spring Project” that involved painting, so I decided to redo the kitchen makeover and this time not leave it uncompleted. I also decided to get over my fear of color, and chose a very light green color for the walls. Also, I had originally put up a simulated beadboard/wainscoting wood wall, but for various reasons, I no longer liked it and wanted to rip it down.
I made a list of action items, which grew as the project progressed, and which I decided to break into three phases, so I could feel a sense of accomplishment which would help me persevere in completing the entire project:
Phase 1:
- Tear down wood beadboard wall (paneling/wainscoting wall)
- Spackle/patch wall
- Primer wall
- Primer and paint wood trim and nail it to walls
- Paint walls
- Replace electrical outlet by exterior door
- Paint exterior and interior doors
- Interior door wall corner sheet rock problem (narrow 1 inch strip broken off in some sections)
- Exterior door light switch problem – paint (small section still visible where light cover didn’t cover it)
- Putty interior door frame corner and paint (45 degree corner not seamless) (this still needs to be done)
Phase 2:
- Paint ceiling
Phase 3:
- Repaint cabinets
- Grout counter edge
- Add rubber foot kick stop edging under cabinets similar to what used to be there?
Technically, Phase 1 isn’t 100% complete due to the last item, and I still need to put the door knob back on the interior door, but I’m declaring it done, since my plan is to continue with Phase 2 and 3 next weekend.
The color and kitchen look heavenly! I used Behr’s Green Tinge PPKB-40 and it is perfect! I bought it at Home Depot, along with painting supplies. (When it was first painted, we had a bunch of rainy and/or overcast days, so it was awhile before I got to see it in its full beauty with the sun shining. But even when it’s overcast, the room color looks great.)
The after pictures don’t do justice to the wall color. It’s fantastic in person!
Before:

© All Rights Reserved

© All Rights Reserved
During:

© All Rights Reserved
After:

© All Rights Reserved

© All Rights Reserved

This looks fantastic Anne! Iknow how hard the work is (oddly enough I just hand scaped a linoleum floor from one of our rentals yesterday)! What a wonderful and bright kitchen space you have now. I always think the kitchen (next to the art room) is the most important room in a house. Congrats on phase 1!
ReplyDeleteOh wow, it looks really great! I went to the Behr site to check out the color and it is nice and soothing. You are so ambitious to tackle this big project yourself. My kitchen, thanks to Bennett's redo, is such a happy site when I get home from work now. Can't wait till you are finished so I can come down for a visit and art play date!
ReplyDelete